


Introduction
Whenever you and I start a node program on our computer, the node automatically creates one thread and executes all of our code inside the node in that single thread. The credit for this amazing explanation of Event Loop goes to Node JS: Advanced Concepts course on Udemy.
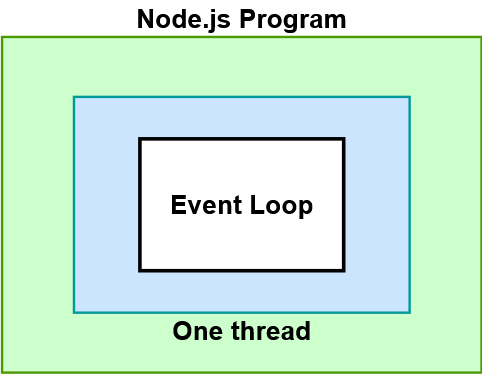
Let us try to understand the illustration shown above:
Inside the single thread box (represented by a blue box) in the event loop.
The event loop is a control structure that decides what our one thread should be doing at any given time. This event loop is the core of every node program you and I run. Every program executed has precisely one event loop.
Understanding how the event loop works are critical because many performance concerns about node.js are boiled down to eventually how the event loop behaves. So essentially, if you understand this event loop, it becomes easy to understand performance issues in node.js. But there’s a little bit of a problem in understanding it.
Understanding the event loop is tough. It’s not easy. There are many talks, blog posts, and diagrams online to help you know, but it isn’t easy to wrap your head around.
We will understand the event loop differently.
Dig deeper into the event loop
Rather than looking at some complicated diagrams, we will write fake code that doesn’t work. This fake code, or like pseudo-code, will emulate the event loop and how it works to make the node work.
The code we will write here will walk you through the series of operations that occur every time we start up a node program on our machine. Let us start step by step:
- Step 1: Let’s start by adding a comment at the top that pretends we are starting up a node application. So we might start a node application by running a command at our terminal. Let’s add another comment that says to exit back to the terminal. So in between these two lines, we’re going to write out the entire lifecycle of a node application, everything from starting it up to exiting back over to the terminal. Let us see the pseudo-code for this step.
// node app.js (Running the node command on the terminal)


// Exit back to the terminal
- Step 2: When you start up a node file to execute it, the event loop does not immediately get executed. Instead, at the very start, when we first invoke the node and feed in a file, the node takes the contents of this file (
app.jsin our example), and executes all the code inside. Let's write out a line of code underneath the comment that pretends or symbolically indicates that the contents ofapp.jsthe file get executed by the node. Let us see the pseudo-code after implementing step 2:
// node app.js (Running the node command on the terminal)

app.runContents(); // Execute the contents of the file app.js


// Exit back to the terminal
- Step 3: After executing the file’s contents, we enter the Node event loop immediately. We are going to represent this event loop with a
whileloop. Let's write a typicalwhileloop.
// node app.js (Running the node command on the terminal)

app.runContents(); // Execute the contents of the file app.js

// Event loop
while(someCondition){

}

// Exit back to the terminal
The event loop or the
whileloop will be executed until the program is executed entirely. We refer to this execution of the body as a tick. So every time the event loop runs inside our node application, we refer to that as one tick.Step 4: Each
whileloop we ever write has some condition tied to it. We will create a function that will return a boolean value indicating when the event loop should stop. And whenever that function returns false, thewhileloop will no longer execute. That same idea applies to the event loop as well. So every time the event loop is about to run, the node first does a quick check to decide whether or not it should allow the loop to proceed for another iteration. If the node chooses that the loop should not be entered or it should not be executed again, then the body of the entire event loop gets skipped. Or, in our program, thewhileloop's body gets skipped, and the program exits back to the terminal. Let us now write the function and have a look at the pseudo-code:// node app.js (Running the node command on the terminal) app.runContents(); // Execute the contents of the file app.js function ShouldEventLoopContinue(){ } // Event loop while(ShouldEventLoopContinue()){ } // Exit back to the terminalStep 5: Let us now move forward and the logic inside the function
ShouldEventLoopContinue(). So, three scenarios are checked:The first check that the node does when it’s deciding whether or not it should continue running our program is to check if there are still any functions that are registered with
setTimeout(),setInterval(), orsetImmediate()and still, need to be executed.The second check that the node does is to decide the presence of any pending operating system tasks. For example, a server listens to requests on some port.
The third check is to check if any long-running operations are still being executed inside our program. An example of a long-running process would be something like a function call inside the
fsmodule to read and write to the files.Let us now write the pseudo-code for this step.
  // node app.js (Running the node command on the terminal)

  const pendingTimers = []; // to store the setTimeout(), setInterval(), and setInterval() functions calls
  const pendingOSTasks = []; // to store any pending OS tasks
  const pendingOperations = []; // to store any long running operation like reading a file

  app.runContents(); // Execute the contents of the file app.js

  function ShouldEventLoopContinue(){

      return pendingTimers.length || pendingOSTasks.length || pendingOperations.length;

  }

  // Event loop
  while(ShouldEventLoopContinue()){

  }

  // Exit back to the terminal
So, we created three arrays to store the different types of operations the
shouldEventLoopContinue()function would check. Then inside this function, we implemented a very simple pseudo-logic to check for all the three conditions discussed above and return a boolean value. Now, internally, the node is going to automatically detect when our JavaScript code that sets up something like asetTimeout()call or issues a new call tofsmodule. This automatic detection occurs even during that initial run of our JavaScript file. So these arrays are created as soon as we develop our program where we started the program at the terminal, and then these arrays get records added to them.Step 6: This is the last step in which we will implement the event loop’s functionality. So, an event loop performs the operations mentioned below:
The very first thing that occurs inside of an event loop is that it looks at the
pendingTimersarray, and it looks at all the different functions that have been passed tosetTimeout()andsetInterval(). If any of those timers have expired, then the event loop calls the relevant callbacks associated with each one.The second thing that occurs inside an event loop is looking at pending OS tasks and operations and calling the relevant callbacks. Examples of these would be the exact examples we laid out before. If some request comes into some port that a server is listening on or if some file is successfully retrieved off of our computers, or hard drive, then during this stage, the event loop will detect that those things have been completed. It will call the relevant callbacks, like the callback to receive a file that’s been fetched or a callback to handle an incoming request.
During step three, the node pauses execution temporarily. During this pause, the node sits around and waits for new events to occur. So node sits here and pauses, saying that I will continue whenever some events occur, whether a new pending OS task is complete, a new pending operation is done, or a timer is about to complete.
Step four only looks for functions that have been registered with
setImmediate(). Remember,setImmediate()it is very similar tosetTimeout()andsetInterval()just in case you have never used it before. So the event loop again looks at the pending timers and calls any functions registered usingsetImmediate().Step five is to handle any close events. Let us take an example of a read stream object. We can register an event to run whenever the stream is about to close. During that event trigger, we could do some cleanup work. So we might be doing a console log, or we can run some amount of cleanup code that maybe terminates any running servers or terminates any open files we have. Essentially, this last step inside the event loop is about just handling cleanup code and cleaning up and making sure that we don’t have any dangling loose ends inside of our program.
Let us now write our pseudo-code that works in the above-discussed manner.
  // node app.js (Running the node command on the terminal)

  const pendingTimers = []; // to store the setTimeout(), setInterval(), and setInterval() functions calls
  const pendingOSTasks = []; // to store any pending OS tasks
  const pendingOperations = []; // to store any long running operation like reading a file

  app.runContents(); // Execute the contents of the file app.js

  function ShouldEventLoopContinue(){

      return pendingTimers.length || pendingOSTasks.length || pendingOperations.length;

  }

  // Event loop
  while(ShouldEventLoopContinue()){
      // Step 1: Check for any pendingTimers available to be executed by setTimeout() or setInterval().

      // Step 2: Check for pendingOSTaks and pendingOperations and executed their callbacks.

      // Step 3: Pause the execution and continue when a new event occur

      // Step 4: Check for pendingTimers and call functions registered using setImmediate().

      // Step 5: Handle the 'close' events

  }

  // Exit back to the terminal
So that’s it. The five steps are executed during every execution of the event loop. This occurs during every single tick that arises. And probably the most important thing to understand here is step three, that we wait around and wait for some amount or some event to occur rather than running through the event loop as fast as possible.