Implement OCR API Using FastAPI
Learn to create a REST API that performs OCR on multiple images concurrently using FastAPI.
Save images to the server
Let’s now create a function that accepts your image, the path of the directory on the server where you want to store the image, and the name of the saved image. We can name this function _save_file_to_server().
import shutil
import os

def _save_file_to_server(uploaded_file, path=".", save_as="default"):
    extension = os.path.splitext(uploaded_file.filename)[-1]
    temp_file = os.path.join(path, save_as + extension)

    with open(temp_file, "wb") as buffer:
        shutil.copyfileobj(uploaded_file.file, buffer)

    return temp_file
Explanation
We defined our function and also assign the default values to the
pathparameter and thesave_asparameter, which is the name of the image while saving on the server.We tried to find out the extension of the uploaded file. In our case, it can be
png,jpg, or any other image format.Then, we created the image path using the
osmodule.We copied the uploaded image onto our server directory.
Finally, we returned the image path that will be used by our
read_image()function to extract the text from the images.
Create api/v1/extract_text route
Now, let’s create the final route that will perform the OCR. The below file is our main.py file. We saved the function _save_file_to_server() in a file named utils.py and read_image() function in ocr.py file. Note that both these functions are already discussed earlier.
from fastapi import FastAPI, File, UploadFile
from typing import List
import time
import asyncio
import ocr
import utils

app = FastAPI()

@app.get("/")
def home():
    return {"message": "Visit the endpoint: /api/v1/extract_text to perform OCR."}

@app.post("/api/v1/extract_text")
async def extract_text(Images: List[UploadFile] = File(...)):
    response = {}
    s = time.time()
    for img in Images:
        print("Images Uploaded: ", img.filename)
        temp_file = utils._save_file_to_server(img, path="./", save_as=img.filename)
        text = await ocr.read_image(temp_file)
        response[img.filename] = text
    response["Time Taken"] = round((time.time() - s),2)

    return response
Explanation:
We define a
POSTroute as we are going to send the data to our API. It should be aPOSToperation.We defined an
asyncfunction because we are going to perform someawaitinside this function. This is the handler function for thePOSTroute. This function accepts a request body of images. The type of request body will beUploadFile, and it would be treated as aFile. Also, we can expect multiple images in one request body, and hence, we have usedList,which specifies that the API can expect a list of uploaded files.We defined an empty dictionary named
responsethat will contain our response.Then, we saved the current time to check how long it will process multiple images and run a loop by taking each image one by one.
We called our function
_save_file_to_server(),which returns the path of the image after uploading it to the server.We called the
read_image()function. We need to useawaitas the function.read_image()is asynchronous.We appended the extracted text for each image in the desired format that we discussed in the previous article in this series. We also appended the time taken to process all the images.
Test the API
You can start the server using the command given below if you are trying this locally. When you run the above code snippet, it will internally run the command given below only:
uvicorn main:app --reload
Then, you can visit the UI docs for testing the API. To visit the API documentation generated automatically for you by FastAPI, you can visit the following URL:
http://localhost:8000/docs
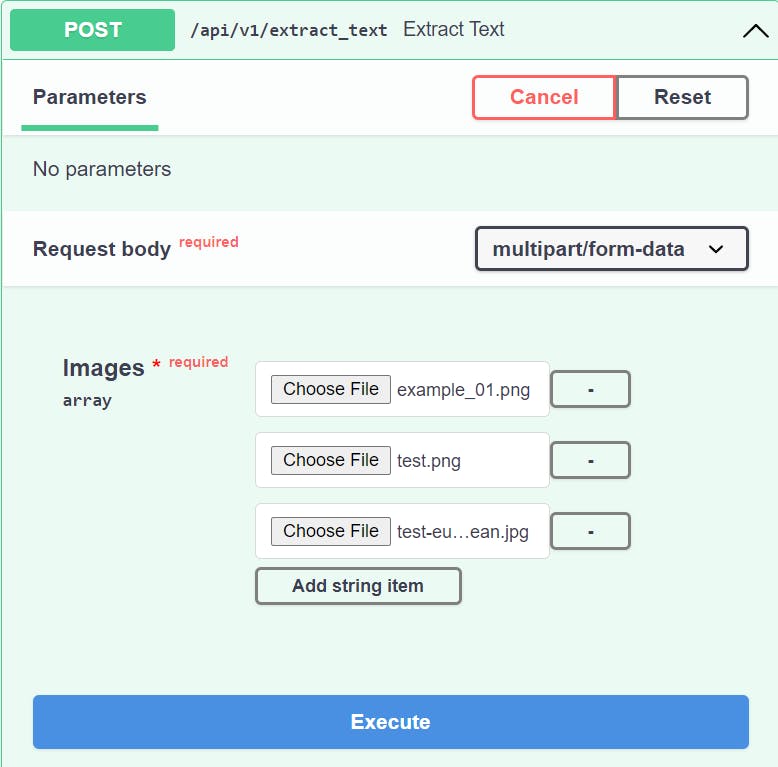
Now, we can upload multiple images by going to our /extract_text API route. You should be able to see something similar as shown below:

You need to upload the images. You can click on the “Add item” button to add more than one image. Then, click on the “Execute” button. Once you click the "Execute" button, you should see a response as shown below:

It looks like our API worked correctly and processed all three images passed as the request body to our API.
One thing to note here is that the time taken to process all the images is around eight seconds. This means that for each image, the API waits for
2seconds, as we mentioned the sleep of2seconds in ourread_image()function. Instead of this, the API should take a2seconds to pause for only one time (concurrent processing). If you want to learn how this problem can be solved, you can visit my recent course Build a REST API Using Python and Deploy it to Microsoft Azure which covers a lot more things like FastAPI, Microsoft Azure, Deploying FastAPI applications to Azure, Monitoring the applications using Azure, and more projects. Feel free to connect if you have any questions.
